This 5 min tutorial will show you how to manipulate and analyze nucleotide sequences inside GenBeans using the Sequence Viewer.
![]() Loading the sample sequence in the editor
Loading the sample sequence in the editor
![]() Switching between Explorer and Editor window
Switching between Explorer and Editor window
![]() Viewing the complement sequence
Viewing the complement sequence
![]() Selecting and analyzing subsequences
Selecting and analyzing subsequences
![]() Working with sequence features
Working with sequence features
Loading the sample sequence in the editor
1. Start a GenBeans session and open the Help & Tutorial Center found in the Help menu.
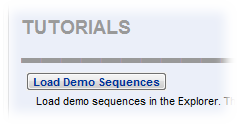
2. Click on the Load Demo Sequences button; this will open the Explorer window and install the demo sequences under the folder 'Sequences'.

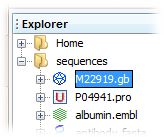
3. Double-click on the GenBank file M22919 icon in the Explorer window to open the sequence in the Viewer.

4. Click alternatively in the GenBank and the Viewer button located in the Editor toolbar to switch the view between the GenBank record and Viewer view. The Editor toolbar is located on the North (Top) side of the Editor window.

Switching between Explorer and Editor windows
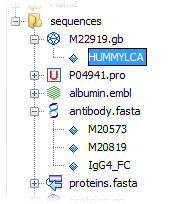
To locate the folder containing a sequence, right-click anywhere in the Editor window and choose the submenu item Select in Explorer; alternatively use the shortcut Ctrl+Shift+1. This will open the Explorer window if needed and expand the folder tree till the file containing the sequence is selected. Note that the file itself is expanded one level further down to show the varied sequences contained in it. For example, expand the FASTA file antibody.fasta by clicking on the '+' sign in front of the FASTA icon to access all the sequences contained in this particular file.

Viewing the complement sequence
Switch the view to Viewer mode and click on the Show/Hide Complement Sequence button (![]() ) found in the Editor toolbar to show or hide the complement sequence.
) found in the Editor toolbar to show or hide the complement sequence.

Selecting and analyzing subsequences
The following section will show how to operate the selection of nucleotide subsequence in the sequence Viewer.
1. Select the Viewer view in the sequence Editor and open the Properties window on the right side of GenBeans main window using the shortcut Ctrl-2. Pin down the Properties window by clicking on the Pin button located at the upper right corner of the window.
2. Click anywhere on the nucleotide sequence and drag the mouse while holding the button to operate a selection. Note that the cursor must be positioned in the sequence at the start to operate a selection. For example, if you first click in a translation, no sequence selection is created while dragging the mouse. At any time, selected sequences in the Viewer are also shown in the Properties windows.

3. To select the entire sequence, either triple-click in the sequence or use the shortcut Ctrl-A.
4. While changing the selection, the status bar at the bottom of the Editor displays the sequence position under the cursor and the start, the end and the length of the selection; the translation at the beginning and the translation at the end of the selection and the overall frameshift are also shown. Simultaneously, length, GC content and Tm for PCR of the selected sequence are indicated in the Properties window.
5. Right-click in the Editor window and go to the submenu Sequence Analysis to perform varied analyses such as restriction, search for ORF, etc. A sequence much be selected to enable the Sequence Analysis submenu. To analyze the entire sequence, either triple-click anywhere in the sequence, use the shortcut Ctrl-A to select the entire sequence, or use the shortcut Ctrl+Shift+1 to select the sequence in the Explorer window; the Sequence Analysis submenu will also be available in the Explorer by right-clicking on the sequence icon. Note that all sequence analysis operations are also available in the main menu Analyses.
Select the sequence to be edited or position the cursor at the editing point on the sequence and click on the Edit Sequence button (![]() ) in the Editor toolbar. Alternatively use the shortcut Ctrl-D to activate the editing panel; note that the shortcut Ctrl-Shift-D will allow direct editing of the reverse complement sequence. Alternatively type any nucleotide symbol to start the editing.
) in the Editor toolbar. Alternatively use the shortcut Ctrl-D to activate the editing panel; note that the shortcut Ctrl-Shift-D will allow direct editing of the reverse complement sequence. Alternatively type any nucleotide symbol to start the editing.
Working with sequence features
Creating new features
To create a feature, select the corresponding sequence location in the Viewer and click on the New Feature... button (![]() ) found in the Editor toolbar. A few varied options to create features will be proposed, including a generic option where up to 5 feature qualifiers can be edited. Once created, the new feature will be drawn in the Viewer with its key written in black at the start of its location on a line located immediately under the sequence line. If a label is given to a feature, it will be used instead of the feature key to name the feature. Primer features are represented as arrows unless a label is given; the translation of CDS features is also represented in 3-letter code and italic characters in a new line located above the sequence line. Double-click on a feature to select all features having the same key; for example, double-click on any CDS feature in the sample sequence and a several small stripes will become highlighted on the West side of the Editor window, each indicating the location of other CDS features.
) found in the Editor toolbar. A few varied options to create features will be proposed, including a generic option where up to 5 feature qualifiers can be edited. Once created, the new feature will be drawn in the Viewer with its key written in black at the start of its location on a line located immediately under the sequence line. If a label is given to a feature, it will be used instead of the feature key to name the feature. Primer features are represented as arrows unless a label is given; the translation of CDS features is also represented in 3-letter code and italic characters in a new line located above the sequence line. Double-click on a feature to select all features having the same key; for example, double-click on any CDS feature in the sample sequence and a several small stripes will become highlighted on the West side of the Editor window, each indicating the location of other CDS features.
Selecting, editing and deleting a feature
Click once on any feature for selection; the selected feature will be highlighted by a gray background and the feature location on the sequence will be indicated in light blue. To edit the selected feature, right-click on it and choose the submenu Edit Feature... in the popup window. A Delete submenu is also proposed or directly delete the feature using the shortcut Delete on the keyboard.
Selecting the sequence location of a feature
Click twice on any feature while pressing the Control (Ctrl) key will select the nucleotide sequence between the minimum and the maximum of the feature location.
Learning about feature properties by opening a tooltip
Position the cursor over a feature to open a small tooltip window showing the feature properties.
The 6 translation frames can be individually drawn in the Viewer window. First select the sequence whose translation needs to be analyzed and switch the representation by clicking on the Translate button (![]() ) found in the Editor toolbar. Clicking on the arrow located on the right side of this button will open a small popup window where more translation options are available. Alternatively use the shortcuts Ctrl-T and Ctrl-Shift-T to show the 3 sense frames or all 6 frames.
) found in the Editor toolbar. Clicking on the arrow located on the right side of this button will open a small popup window where more translation options are available. Alternatively use the shortcuts Ctrl-T and Ctrl-Shift-T to show the 3 sense frames or all 6 frames.
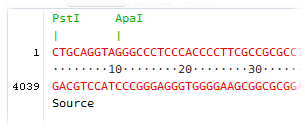
Select a stretch of nucleotides in Viewer mode and click on the Mark Restriction Sites button (![]() ) found in the Editor toolbar to highlight restriction sites. Clicking on the arrow located on the right side of this button will open a small popup window where more options are available. Refer to the documentation on using the Restriction Enzymes window found here to decide which sites will be looked for.
) found in the Editor toolbar to highlight restriction sites. Clicking on the arrow located on the right side of this button will open a small popup window where more options are available. Refer to the documentation on using the Restriction Enzymes window found here to decide which sites will be looked for.
Click once on a restriction site to select it; the selected site will become highlighted in green and the recognition site on the sequence will be indicated in light blue. Click twice on a restriction site to select all known identical sites on the entire sequence.
Click once on a restriction site while pressing the Control (Ctrl) key will select the restriction site nucleotide sequence.
While in viewing mode, click on the main menu item Edit > Find... to open the search bar located at the bottom of the Editor; alternatively use the shortcut Ctrl-F to start a search session. In the Find Sequence combobox on the left side of the search bar, type the nucleotide sequence to be looked for; any IUPAC nucleotide symbol can be entered. Motifs will be highlighted as they are found throughout the entire sequence; mark or unmark the Highlight Results switch to turn on and off the overall highlighting (orange color); mark or unmark the Reverse Complement switch to search the reverse complement sequence.

![]() Please, report all bugs to improve your experience with GenBeans
Please, report all bugs to improve your experience with GenBeans