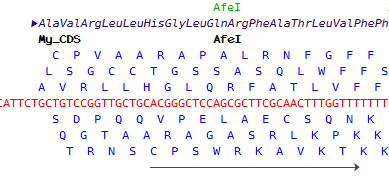
Multiple representations are used to display features in the viewer. CDS features are shown on an independent set of lines located above the sequence between the 3-frame translations and restriction enzymes. All other features except the source feature are represented by their name on lines located below the sequence; some features (primer, gene, exon) use a graphic representation instead of names. Finally feature labels are represented above the sequence. between the translation and the CDS:

Most expected operations on features are accessible through specific wizards in GenBeans; for higher-end expert-level operations, please refer to the GenBank feature table definition.
Creating a new feature
1. Select the location of the new feature on the sequence line.
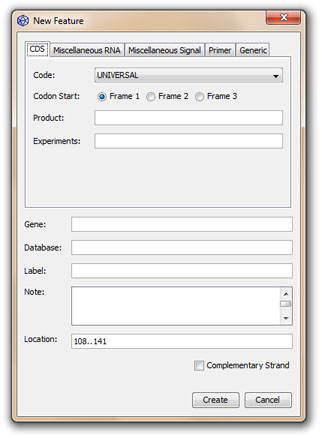
2. Click on the New Feature... button (![]() ) on the Editor toolbar to open the feature panel:
) on the Editor toolbar to open the feature panel:

3. Choose a subpanel and edit manually the value of the different feature qualifiers.
Working with labels
Labels allow features to be referred to unambiguously. They are represented in the viewer independently from other features above the sequence (see figure above). Labels can be edited directly in the feature panel (see figure above). Note that since the GenBank feature table definition version 10.2 (May 2012), labels are no longer legal. GenBeans still uses the label qualifier; this may change in future releases of GenBeans.
Bracket Representation
Adding a dash character '-' on each side of a label will generate a bracket representation encompassing the entire feature. For example, labeling a feature "-FR1-" will create the representation "<------------------- CDR3 --------------------------->" covering the entire feature.
Underscore Representation
Adding an undescore character '_' on each side of a label will generate an underscore representation encompassing the entire feature. For example, labeling a feature "_CDR3_" will create the representation "______ FR1 ________" covering the entire feature.
Selecting a feature
Click once inside the feature name to select the feature; the selected feature will appear on a gray background and its characteristics such as feature qualifiers and location will be visible in the Properties window.
Click twice in a feature to select all features having the same feature key in the entire sequence. Locations of the selected feature are shown with little stripes on the right side on the Editor.
Selecting the feature location on the sequence line
Click twice in a feature while holding the Control (Ctrl) key will select the nucleotide sequence between the minimum and the maximum of the feature location.
Editing a feature
1. Select a feature with the mouse.
2. Right-click to open the contextual menu a choose the option Edit Feature....
3. Edit the feature qualifiers or the location directly in the feature panel.
Deleting a feature
1. Select a feature with the mouse.
2. Right-click to open the contextual menu a choose the option Edit Feature....